Apache and Nginx Settings
By default, Plesk uses the Apache web server (http://en.wikipedia.org/wiki/Apache_HTTP_Server) to deliver the pages of your website to clients (such as browsers, through which visitors access your website). To achieve better performance, Apache is supplemented with another web server - nginx. You also have the option to use nginx only.
Default web server settings are specified by the server administrator (hosting provider). These settings determine how web servers process various types of files, how they use SSL/TLS, where they store log files, and so on.
However, you (as a website owner) can set up custom web server settings for your website. For example, add a type of the index file, restrict access to the site, and so on.
Note: You can adjust web server settings for your websites if your hosting subscription provides the corresponding permission.
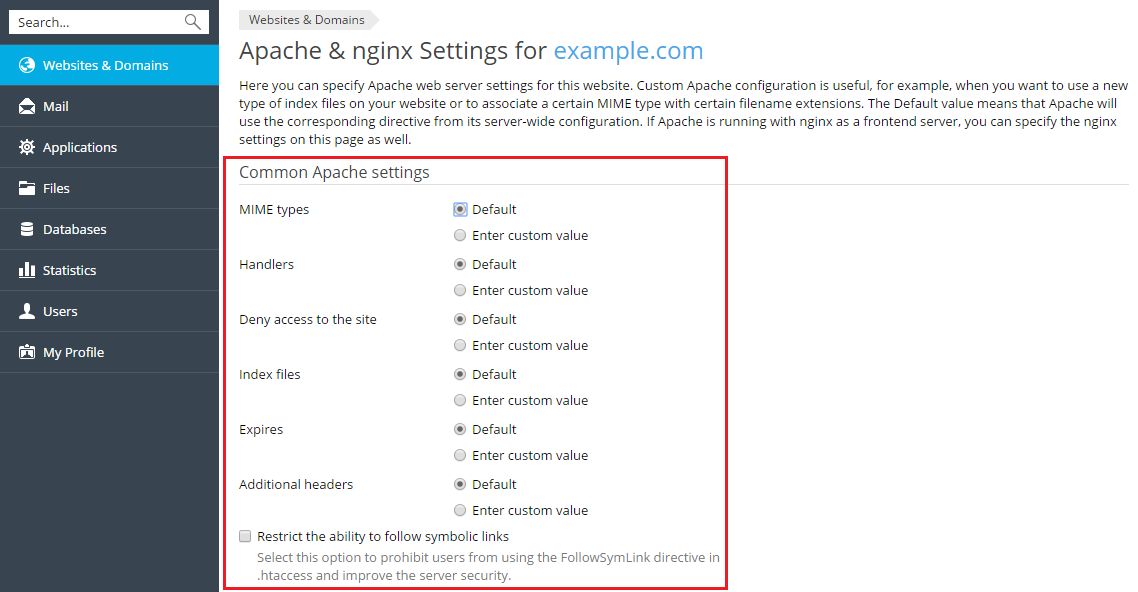
Adjusting Apache and Nginx Settings
Apache and nginx have certain settings you can customize on the domain level. They are located in Websites & Domains > domain name > Apache & nginx Settings. These settings are divided into two groups:
- Common Apache settings
- nginx settings
Configuring MIME Types
MIME types match file extensions with file types to instruct web browsers how to handle certain types of files. For example, the following MIME type
text/plain .txt
instructs the web browser to process all .txt files as plain text. By default, most common MIME types are already preconfigured. However, if you find that the pages of your website cannot be properly processed by web browsers because you use files with non-standard extensions, you need to configure one or more custom MIME types.
To configure custom MIME types:
- Go to Websites & Domains > Apache & nginx Settings.
- Under MIME types, select the Enter custom value radio button.
- Type in or delete the desired MIME types, and click OK.
Configuring Apache Handlers
Apache handlers instruct the web server how to process files with specific extensions. For example, the following handler
cgi-script .cgi
instructs the web server to treat all .cgi files as cgi scripts. By default, handlers for files with common extensions are already preconfigured. However, if you want to change which handler is used to process files with a specific extension, you need to configure one or more custom handlers.
To configure custom handlers:
- Go to Websites & Domains > Apache & nginx Settings.
- Under Handlers, select the Enter custom value radio button.
- Type in or delete the desired handlers, and click OK.
Denying Access to the Website
You can prevent certain visitors from accessing your website. You can deny access to:
- Individual IP addresses (for example,
192.168.1.110) - Subnets of IP addresses (for example,
127.0.0.1/8) - Specific host names (for example,
example.com) - Everyone (by using an asterisk "
*" character )
Blocked visitors will receive a "403 Forbidden" error message when trying to browse your website.
To configure access to your website:
- Go to Websites & Domains > Apache & nginx Settings.
- Under Deny access to the site, select the Enter custom value radio button.
- Type in or delete the desired IP addresses, subnets, or hostnames.
- If you blocked a subnet, but would like to allow one or more IP addresses belonging to it to access your website, type them in the Excluding field.
- Click OK.
Configuring Index Files
Whenever a visitor to your website browses a URL requesting a directory instead of a specific file (for example, www.example.com or www.example.com/example instead of www.example.com/index.html), Apache looks for an index file to display. By default, Apache looks for the following files (in the order specified):
index.htmlindex.cgiindex.plindex.phpindex.xhtmlindex.htmindex.shtml
If all seven files were to be present in a directory, a visitor browsing it would be served the index.html file. If index.html were to be missing, Apache would look for the index.cgi file instead, and so on. If no suitable index file is found, by default, a "403 Forbidden" error is displayed.
Plesk allows you to customize what index files Apache looks for whenever a visitor browses a directory on your website:
- You can change the order in which Apache looks for index files (for example, you may want it to display the
index.phpfile by default instead ofindex.html). - You can add index file names to the list, or remove them (for example, if your website's default page is named
hello.php, you can have Apache serve it by default).
To configure the index files:
- Go to Websites & Domains > Apache & nginx Settings.
- Under Index files, select the Enter custom value radio button.
- Type in or delete the desired names of index files in the order in which Apache should look for them, and click OK.
Configuring the "Expires" Header
The Apache expires header governs how long web browsers can keep cached copies of your web content before requesting it again from the server. Configuring this header can decrease the server load and speed up your website.
For example, you set the expiration period to 10 days. A visitor browses your website, requesting its index.html page. The visitor's web browser stores a copy of the page in its cache, and for the next 10 days it would serve the cached copy every time the visitor browses your website. On the eleventh day, if the page is requested again, the browser would request the page again from the server, because the one it stores in the cache is past its expiration date.
When configuring the expires header for websites featuring dynamic content, we recommend enabling the response with Expires headers for static files only option. Otherwise, all content, including dynamic content, will be stored in the visitors' browsers' cache for the duration of the expiration period. This is not recommended, because the dynamic content is, as a rule, updated frequently.
To configure the "Expires" header:
- Go to Websites & Domains > Apache & nginx Settings.
- Under Expires, select the Enter custom value radio button.
- Specify the desired expiration period (the recommended length of the expiration period is 14 days).
- If your website features dynamic content, make sure that the response with Expires headers for static files only checkbox is selected.
- Click OK.
Note: If nginx is enabled, only files served by Apache will have the expires header. If the Smart static files processing checkbox is selected, which files are treated as static is determined by the Apache and nginx default configurations. If the Serve static files directly by nginx checkbox is selected and any file extensions are specified, nginx only serves the files with the specified extensions.
Configuring Additional Headers
You can configure additional headers to HTTP responses according to the following pattern:
Name : Value
HTTP response headers contain information about the requested page to instruct web browsers to perform various actions. For example, the following header will protect the visitors to your website against clickjacking:
X-Frame-Options: DENY
To configure additional headers:
- Go to Websites & Domains > Apache & nginx Settings.
- Under Additional headers, select the Enter custom value radio button.
- Type in or delete the desired headers, and click OK.
Restricting the Ability to Follow Symbolic Links
By default, Apache is allowed to follow symbolic links. If your website does not use symbolic links, we recommend disabling this option as it presents a minor security risk.
To forbid Apache from following symbolic link:
- Go to Websites & Domains > Apache & nginx Settings.
- Select the Restrict the ability to follow symbolic links checkbox and, and click OK.
Nginx-Only Hosting
On Plesk for Linux, you can host websites using a combination of nginx and PHP-FPM. In this case, requests to websites are not passed to Apache but are served by nginx instead. Nginx-only hosting is a solid option for PHP websites, but it is also well-suited for hosting static websites and application servers. You can configure individual websites to be served only by nginx without stopping or disabling Apache, and it does not impact websites hosted using Apache in any way.
Note: Plesk services (for example, Webmail) continue working using Apache and are not affected by switching to nginx-only hosting.
To switch on/off nginx only hosting for a domain:
- Go to Websites & Domains > Apache & nginx Settings.
- In the nginx settings section, clear the Proxy mode checkbox.
- Click Apply.
To revert a domain to Apache+nginx hosting, select the Proxy mode checkbox.
Known limitations
When you switch a domain to nginx-only hosting, you face certain limitations:
- File Sharing becomes unavailable.
- SSI, Perl, and Python support become unavailable.
- You can only use the "FPM application server by nginx" PHP handler.
Configuring Static Files Processing
By default, on Plesk for Linux servers, nginx and Apache work in tandem, with Apache serving dynamic content and nginx being used as a proxy serving static content. This scheme optimizes the usage of server resources and allows Plesk to serve requests to hosted websites faster. However, Plesk allows you to choose how static content for your websites is to be handled.
Serve all static content via nginx
This is the default way Plesk for Linux operates. Whenever a request for static content comes in, Apache only indicates the corresponding file's location, and nginx finds and serves it.
To serve all static content via nginx:
- Go to Websites & Domains > Apache & nginx Settings and scroll down to the "nginx settings" section.
- Select the Proxy mode and Smart static files processing checkboxes.
- Make sure that the Serve static files directly by nginx checkbox is not selected.
- Click OK.
Serve only files with specific extensions via nginx
If you want, you can have only files with specific extensions to be served as static content by nginx. Other files usually classified as static content are served by Apache. It is important to note that under this scenario, requests for files with the specified extensions never reach Apache at all. Consequently, they do not pass through Apache handlers. This means, for example, that rewrite rules or .htaccess directives are not applied.
To serve only specific static content via nginx:
- Go to Websites & Domains > Apache & nginx Settings and scroll down to the "nginx settings" section.
- Select the Proxy mode and Serve static files directly by nginx checkboxes.
- By default, certain static files extensions are already preconfigured in the Serve static files directly by nginx box. You can add or remove the extensions as necessary. Separate individual file extensions using whitespaces or the "|" character.
- Click OK.
Note: Enabling the “Serve static files directly by nginx” option automatically disables the default “Smart static files processing” mode, even if the checkbox of the latter remains selected.
Serve all static and dynamic content via Apache
If you want, you can disable nginx and configure Apache to serve all content, both static and dynamic. It can be useful in specific cases, for example, nginx troubleshooting. For production websites, we do not recommend using Apache to handle all content.
To serve all static and dynamic content via Apache:
- Go to Websites & Domains > Apache & nginx Settings and scroll down to the "nginx settings" section.
- Select the Proxy mode checkbox.
- Clear the Smart static files processing and Serve static files directly by nginx checkboxes.
- Click OK.
Enabling nginx caching
Enabling nginx caching allows the nginx proxy server to cache certain website dynamic content. The cached data is stored for a short time (usually no more than several seconds). This can help speed up the website load time and reduce server load.
Enabling nginx caching is recommended only for websites with a specific profile (for example, popular blogs or news websites):
- High traffic.
- The content is updated every few seconds.
Enabling nginx caching can be useless or even harmful for websites with the following profile:
- Moderate or low traffic.
- The content is updated less often than every few seconds.
- Personalized content is used (for example, the visitor’s geographical location or the contents of their shopping cart).
To enable nginx caching:
- Go to Websites & Domains > Apache & nginx Settings.
- In the “nginx settings” section, select the “Enable nginx caching” checkbox.
- (Optional) You can customize nginx caching settings. If you are not familiar with nginx caching, we recommend that you keep the default settings. Misconfiguring these settings can hinder the website and server performance.
- Click OK.
Nginx caching settings
Nginx caching settings displayed in the Plesk interface correspond to nginx directives and certain records in the nginx configuration file. You can see the details in the table below.
Nginx microcaching setting displayed in the Plesk GUI |
The corresponding nginx directive |
The corresponding nginx parameter (if any) |
“Cache size“ |
|
|
“Cache timeout“ |
|
|
“Cache key“ |
|
|
“Cache requests with cookies“ |
Specified in the nginx configuration file |
|
“Disable caching for locations“ |
Specified in the nginx configuration file |
|
“Bypass cache when” |
|
|
“Return stale cached records” |
|
Note: For websites using nginx in tandem with the PHP-FPM handler, proxy_cache* directives are replaced with fastcgi_cache*. For example, the “Cache key“ setting is governed by the fastcgi_cache_key directive instead of proxy_cache_key.
“Cache requests with cookies“ setting
By default, nginx does not cache HTTP requests that contain the Cookie HTTP header. You can change this behavior and have nginx cache HTTP requests containing certain cookies by specifying the names of the cookies in the “Cache requests with cookies” field. For example, if you specify the _ga and _gid cookie names, nginx will only cache HTTP requests with cookie headers that contain _ga or _gid. Nginx will not cache HTTP requests with cookie headers containing at least one cookie name that is not specified in the field.

“Disable caching for locations“ setting
You can reduce server load by configuring nginx to not cache certain web content (for example, dynamic content that is not viewed often). To do so, specify the desired $request_uri in the “Disable caching for locations” field. For example, if you specify /wp-admin/, nginx will not cache content related to WordPress Admin Panel.

Note: If you want to specify several values in the “Cache requests with cookies“ and “Disable caching for locations“ fields, specify each one on a separate line.
The Default Value of Server Settings
You can set the value of each parameter either by typing a custom value, or leaving the Default value. In the latter case, Plesk uses the values from the default web server configuration defined by the server administrator (hosting provider).
Your values override the default ones. The only exception is the Deny access to the site setting - IP addresses from the default configuration, as well as the IP addresses specified by you, will all be applied to your website. In case of a conflict (for example, when you allow the IP address that is denied in the default configuration), Apache uses your settings.